How to Find a Hidden Water Leak in Kansas City Homes
Suspect a hidden leak? Learn how to detect concealed water leaks in your Kansas City home, test your water meter, estimate repair factors, and fix pipe issues.


Need a Plumber in Kansas City, MO?
Plumbing Problem? Call for professional plumbing help.
Get help with emergency plumbing, clogged drains, leaking pipes, water heaters, burst pipes and other residential plumbing problems in Kansas City, Missouri.
Need a Plumber in Kansas City, MO?
Plumbing Problem? Call for professional plumbing help.
Get help with emergency plumbing, clogged drains, leaking pipes, water heaters, burst pipes and other residential plumbing problems in Kansas City, Missouri.
How to Find a Hidden Water Leak in a Kansas City Home
Water running silently inside a wall, beneath a concrete slab foundation, or under your front lawn can quietly cause thousands of dollars in property damage before you ever notice a single drop. Unlike a dripping kitchen faucet or a running toilet, a hidden water leak operates out of sight, steadily weakening building materials, driving up monthly utility bills, and creating ideal conditions for hazardous mold growth.
Homeowners and commercial property owners across the Kansas City metro area—from older residences in Prairie Village and historic structures in Midtown to growing communities in Olathe, Lee’s Summit, and Parkville—face distinct plumbing vulnerabilities. Shifted foundations caused by local clay soil, aggressive tree roots, hard water mineral deposits, and winter freeze-thaw cycles put continuous stress on supply lines.
Knowing how to spot the early warning signs, run basic diagnostic tests yourself, and understand when professional thermal or acoustic equipment is required empowers you to protect your home before minor seepage turns into a structural emergency.
What Is a Hidden Water Leak?
A hidden water leak is an unscheduled release of water from pressurized supply lines, fixture connections, or drainage networks that occurs behind drywall, beneath flooring, inside ceiling cavities, or underground.
Because the piping is concealed behind structural components, water travels along studs, floor joists, or subgrade soil before manifesting visible signs on surface materials.
Common places hidden leaks develop:
-
Inside Wall Cavities: Pinholes in copper lines or failed PEX crimp fittings behind showers, kitchens, and laundry rooms.
-
Under Concrete Slabs: Slab leaks in pressurized hot or cold water lines embedded beneath foundation concrete.
-
Underground Main Supply Lines: Ruptures in the primary incoming supply line running between your municipal water meter pit and the main shut-off valve.
-
Subfloor & Ceiling Spaces: Slow drips at bathroom floor drains, tub overflows, or upper-story supply lines.
Why Do Hidden Leaks Happen in Kansas City Plumbing Systems?
Concealed pipe failures stem from specific structural, chemical, and environmental factors common throughout Jackson, Johnson, and Clay counties:
-
Expansive Clay Soil Movement: Kansas City soil swells significantly when wet and shrinks during dry summers. This heavy shifting moves foundation slabs and puts structural strain on underground supply pipes.
-
Aging Copper & Galvanized Iron Pipes: Older homes across Brookside, Waldo, and Kansas City West Midtown often retain original metal piping. Over 30 to 50 years, internal corrosion thins copper pipe walls, forming tiny pinholes.
-
Hard Water Mineral Wear: Mineral deposits wear down internal pipe walls over time under continuous flow, weakening joints and valves.
-
High Incoming Water Pressure: Municipal supply pressure often enters residential lines at elevated levels. Without a properly adjusted Pressure Reducing Valve (PRV), constant pressure over 80 PSI stretches pipe joints and causes weak fittings to fail.
-
Seasonal Freeze-Thaw Stress: Winter temperatures in the Midwest drop well below freezing. Water trapped in uninsulated exterior walls or foundation lines freezes, expands, and splits pipe walls.
-
Improper Initial Installation: Unsupported long pipe runs, over-tightened threaded fittings, or unreamed copper pipe edges create turbulent water flow that erodes metal over time.
Warning Signs You Should Never Ignore
Catching a hidden leak early requires paying attention to subtle physical, auditory, and financial indicators around your property:
-
Unexplained Spike in Utility Bills: A sudden jump in your monthly water usage without an increase in household activity is the single most reliable sign of a pressurized supply leak.
-
Discolored Water Stains on Walls or Ceilings: Darkening drywall, yellowish rings on plaster ceilings, or blistering paint indicate water migrating from a pipe higher up.
-
Spongy, Warped, or Buckling Floors: Hardwood planks cupping, vinyl tiles lifting, or soft spots developing near baseboards point to subfloor water accumulation.
-
Musty Odors & Damp Air: Persistent earthy smells in basements, crawl spaces, or closed rooms signal trapped moisture and developing mold.
-
Sound of Running Water When Fixtures Are Off: Hearing a low hiss, continuous hum, or faint dripping behind bathroom or laundry walls while every tap is shut.
-
Warm Spots on Concrete Basement Floors: Walking barefoot across a basement or ground floor and noticing a localized warm section on the slab usually indicates a leaking hot water line beneath the concrete.
-
Unexplained Low Water Pressure: A sudden drop in shower or faucet volume across the whole house can indicate water escaping from a ruptured supply line before reaching your taps.
Common Plumbing Problems Related to Hidden Leaks
A hidden leak often triggers secondary plumbing and structural complications across your building:
-
Foundation Slab Leaks: Escaping water washes away supporting soil under foundation footings, leading to floor cracking and structural settling.
-
Wall & Ceiling Drywall Collapse: Saturated drywall loses structural strength, causing heavy ceiling sections to fall inward without warning.
-
Electrical System Hazards: Water traveling along interior wall studs reaches electrical boxes, light fixtures, and outlets, creating immediate short-circuit and fire risks.
-
Accelerated Mold & Mildew Contamination: Toxic black mold (Stachybotrys chartarum) can colonize wet drywall, carpet padding, and wood framing within 24 to 48 hours of initial moisture exposure.
Step-by-Step Professional Repair Process
When you call a licensed plumbing company to investigate a suspected hidden leak, experts follow an organized diagnostic and repair sequence to isolate the issue with minimal property damage:
-
Step 1: Visual Assessment & Pressure Isolation: The technician checks visible fixtures, inspects the water meter, and performs a static pressure test on your plumbing system to confirm a active pressure loss.
-
Step 2: Non-Invasive Diagnostic Scanning: Using thermal imaging cameras, acoustic listening devices, and electronic moisture meters, the plumber maps out heat signatures and sound profiles through walls and floors to pinpoint the leak.
-
Step 3: Pipe Scoping & Location Verification: Fiber-optic inspection cameras or pipe locators track exact pipe depth and trajectory behind structural boundaries.
-
Step 4: Upfront Repair Strategy & Estimate: The plumber explains targeted repair options—such as a localized wall cut, a slab pipe bypass, or a trenchless supply line replacement—with clear pricing before work starts.
-
Step 5: Precision Opening & Pipe Repair: Technicians create small access openings directly at the verified leak site to replace damaged fittings, solder pinholes, or crimp new PEX line segments.
-
Step 6: System Pressure Re-Testing: The supply line is re-pressurized and monitored with precision gauges to verify that the leak is completely eliminated and overall system pressure is stable.
-
Step 7: Cleanup & Long-Term Advice: The work zone is cleaned up, and recommendations (such as installing a PRV or pipe insulation) are provided to prevent future leaks.
Can You Fix It Yourself? Safe DIY Checks vs. Professional Limits
Safe DIY Leak Tests Homeowners Can Perform
-
The Water Meter Test: Turn off every tap, shower, washing machine, and ice maker in your home. Locate your water meter pit near the curb or basement. Take a photo of the meter dial and check the small leak indicator (a small spinning triangle, star, or digital flow display). If the flow indicator moves while everything is off, or if the main dial numbers change after 30 to 60 minutes of zero water usage, water is escaping somewhere on your property.
-
The Food Coloring Toilet Test: Put 10 to 15 drops of food coloring into your toilet tank and do not flush. Check the bowl after 20 minutes. If colored water seeps into the bowl without flushing, your flush valve flapper is leaking silently into the drain.
-
Under-Sink Cabinet Wipe-Down: Run a dry paper towel along cabinet supply lines, shut-off valves, and drain traps under kitchen and bathroom sinks to check for slow, hidden weeping.
When DIY Attempts Become Dangerous
-
Cutting into Drywall or Concrete Blindly: Guessing where a leak is and knocking holes into walls risks damaging intact electrical lines, gas pipes, or structural framing.
-
Over-Tightening Compression Fittings: Turning a wrench too hard on old shut-off valves or brass fittings strips threads and can snap the valve off completely, causing an immediate high-pressure flood.
-
Ignoring Slab Leaks: Attempting to patch a leaking pipe embedded in concrete using surface sealants or DIY epoxy fails under continuous pressure and damages the slab further.
Professional Equipment Used for Leak Detection
Locating a leak buried behind brick, plaster, or several inches of concrete requires specialized technology:
-
Infrared Thermal Imaging Cameras: Detects subtle surface temperature differences on walls and floors, showing cold or hot moisture plumes invisible to the human eye.
-
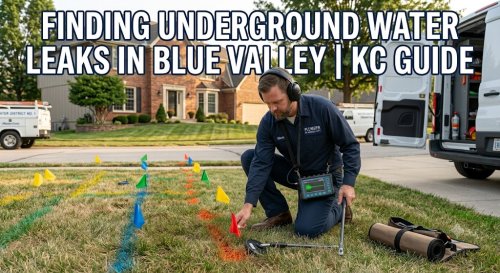
Acoustic Ground Microphones & Amplifiers: High-sensitivity listening devices that pick up the specific acoustic frequency of pressurized water escaping through small pipe cracks.
-
Electronic Pipe & Utility Locators: Electromagnetic transmitters that trace the exact path and depth of metallic or plastic water pipes underground and behind walls.
-
Tracer Gas Detectors: Non-toxic hydrogen-nitrogen gas mixtures pumped into drained lines; sensors detect gas escaping through tiny pinholes where water leaks occur.
-
Endoscopic Inspection Cameras: Flexible, lighted cameras inserted through small access points to visually inspect pipe runs and wall cavities.
How Long Does Leak Detection & Repair Take?
Timelines depend on the location and complexity of the leak:
| Diagnostic & Repair Task | Typical Timeframe |
| Water Meter & Initial Diagnostic Testing | 30 – 60 Minutes |
| Non-Invasive Electronic Leak Pinpointing | 1 – 2 Hours |
| Standard Wall or Cabinet Supply Line Repair | 2 – 4 Hours |
| Underground Main Water Service Repair | 4 – 8 Hours (1 Day) |
| Slab Leak Repair / Overhead Pipe Reroute | 1 – 2 Days |
Cost Factors in Kansas City Leak Detection & Repair
Because hidden water leaks range from simple valve drips to structural main line breaks, exact costs depend on several technical variables:
-
Diagnostic Complexity: Simple visual and meter verification vs. full acoustic and thermal imaging scans.
-
Leak Location & Accessibility: Easily accessible pipes inside open basements cost less to access than lines buried beneath finished tile, concrete slabs, or outdoor driveways.
-
Repair Method Selected: Direct concrete jackhammer excavation vs. non-invasive overhead PEX rerouting around a slab.
-
Materials Needed: Standard copper or PEX fittings vs. commercial-grade main line replacement piping.
-
Emergency Service Needs: Standard business-hour calls vs. middle-of-the-night emergency responses.
-
Surface Restoration Requirements: Simple drywall patching vs. custom tile, floor, or landscape restoration.
Note: Plumbing repair costs vary depending on the severity of the problem, accessibility, materials required, emergency service, property type, and local labor rates.
Hidden Truths Homeowners Should Know
-
Small Pinhole Leaks Cause Huge Expenses: A tiny 1/8-inch pinhole leak in a pressurized supply line can waste over 3,000 gallons of water per day, resulting in unexpected water bill costs.
-
Standard Insurance May Exclude Gradual Leaks: Most homeowners insurance policies cover sudden, accidental pipe bursts, but frequently deny claims for damage caused by slow, neglected leaks left unaddressed over months.
-
Hard Water Shortens Fixture & Pipe Lifespan: Dissolved minerals gradually weaken solder joints, corrode valves, and reduce internal pipe dimensions, accelerating leak formation.
-
Overhead Pipe Rerouting Often Beats Slab Excavation: When a pipe leaks beneath a concrete slab, running a new flexible PEX line through the ceiling or attic is often far cleaner, faster, and more cost-effective than jackhammering floor slabs.
-
Annual Plumbing Maintenance Saves Thousands: A yearly inspection catches minor valve weeping, high water pressure, and early pipe corrosion long before major structural leaks occur.
15 Common Mistakes Homeowners Make
-
Ignoring minor water stains, assuming they are old marks from previous owners.
-
Waiting until water bills double before investigating a sudden usage spike.
-
Turning down home heat during winter trips, leading to frozen and split wall pipes.
-
Using acidic chemical drain cleaners that corrode metal pipe joints from inside.
-
Ignoring household water pressure over 80 PSI without installing a Pressure Reducing Valve.
-
Guessing leak locations and cutting holes in drywall unnecessarily.
-
Hiring unvetted, unlicensed contractors who lack electronic leak detection equipment.
-
Trying to stop pressurized pipe leaks with electrical tape, rubber clamps, or spray sealants.
-
Over-tightening fixture supply nuts and cracking plastic fill valves.
-
Storing heavy boxes or household items directly against exposed supply lines in basements.
-
Failing to clear garden hoses from outdoor spigots before winter frost hits.
-
Forgetting to test the home main water shut-off valve annually to ensure smooth operation.
-
Ignoring rusty water or metal flakes coming from faucets, which signal interior pipe rot.
-
Deliberately delaying repairs because a leak isn’t currently dripping into living spaces.
-
Skipping a sewer lateral and water line scope when purchasing an older home.
Essential Preventive Maintenance Tips
-
Perform Monthly Meter Checks: Run a quick 30-minute water meter test once a month to verify zero hidden flow.
-
Monitor Indoor Water Pressure: Buy an inexpensive pressure gauge that threads onto a hose bib; keep home static pressure between 45 and 70 PSI.
-
Install Smart Leak Detectors: Place wireless water sensor alarms under sinks, behind water heaters, near washing machines, and beside refrigerator water lines.
-
Disconnect Hoses in Autumn: Remove outdoor garden hoses before freezing temperatures arrive to prevent frozen frost-free spigots from splitting inside walls.
-
Insulate Exposed Pipes: Wrap foam pipe insulation around water lines in unheated basements, crawl spaces, and exterior wall cavities.
-
Replace Rubber Appliance Hoses: Upgrade rubber washing machine supply lines to braided stainless steel hoses every 5 years.
-
Check Water Heater Anode Rods: Inspect and replace sacrificial anode rods in your water heater every 3 to 5 years to protect tank walls from corroding.
-
Inspect Under-Sink Shut-Off Valves: Turn under-sink angle stops on and off twice a year to prevent mineral seize-up and check for packing nut weeping.
-
Keep Cleanouts & Shut-Offs Clear: Maintain direct physical access to your main water shut-off valve so you can isolate water immediately during an emergency.
-
Flush Tank Water Heaters Annually: Drain sediment out of your water heater bottom drain valve yearly to reduce tank bottom stress.
-
Address Dripping Faucets Promptly: Replace worn washers and cartridges before backpressure wears down supply connections inside walls.
-
Check Toilet Fill Valves: Inspect toilet tank internals annually to ensure overflow tubes aren't running constantly.
-
Keep Crawlspace Vents Closed in Winter: Block cold winter drafts from sweeping across exposed floor joist pipes.
-
Soften Hard Water Supplies: Consider installing a home water softener if high mineral content is corroding fixtures and pipe joints.
-
Schedule Annual Professional Scopes: Have a licensed plumbing specialist inspect visible lines, pressure regulators, and drainage systems yearly.
When Should You Call an Emergency Plumber?
Call for emergency plumbing services immediately if you notice:
-
Uncontrollable Water Flow: Water spraying continuously from a ruptured wall line or split valve that cannot be isolated.
-
Rapid Ceiling or Wall Sagging: Heavy drywall bulging inward under accumulating water weight overhead.